Sunday, February 24, 2013

Update to Google Forms with Images

I have updated the Google Forms with Images Script. It should now work with the new forms. You no longer need to make a copy of my template - you can add images to existing forms.

The initial setup is the same. You should only have to complete steps 1 through 3 once. If have used a previous version of this script and already have a public GFWI folder, skip to step 4.


1. At the top level or root of your 'My Drive' (by top level I mean not inside any other folder) create a folder called 'GFWI'. (Don't type the quotes!)

2. You need to make this folder public. 


3. Inside of GFWI, create a folder called 'img'. (No period or quotes!) This is the folder where you will upload all of your images. An added benefit of this new system is that you can use the same images for multiple forms.

4. Create a form as you usually would. (Or modify an existing form.) Where you want an image to appear, just type the image name enclosed in double straight brackets. For example [[myimage.jpg]]. You should be able to include images anywhere in the form. (Including answer choices.)

5. After you have added the bracketed image tags, just copy live url for your form. This is the link you would use to distribute your form to end users. Paste that link into this formhttp://goo.gl/RXToK (The first time you use the script you will have to authorize it.)

6. That's it! A link to your form with images should appear. For your records, a spreadsheet called GFWI links will be created inside the GFWI folder.

Known issues: 
  • This does not work with multi-page forms
  • This does not work when the form is set to collect Google Account Usernames
  • I know the formatting could be better. If anyone who is talented with CSS would like to help me update the script and improve the styling, please let me know.
If you need help you can leave a comment here or contact me on Google+.

Thursday, February 14, 2013

Password Reset Tool for Google Apps

Last August we rolled out Google Apps at my school. It is getting used in some really creative ways, but because we are not yet one to one, users are not logging in often enough to remember their passwords. So we get a lot of help desk calls to reset passwords. I know it is not the most secure, but to keep it simple, we have a default password that we always use when we reset. To do this in the control panel, you have to browse for the user, then type in the new password twice. Doing this often gets old. So I wrote a simple script where all you have to do is type in the user name. (This is the email address without the domain.) Next a confirmation screen displays the user's first and last name. One final click and the password is reset to your predetermined default password.

Set up is fairly simple, you can just copy and paste the code from below into a Google Apps Script File, or click here to create your own copy by selecting File -> Make a Copy.

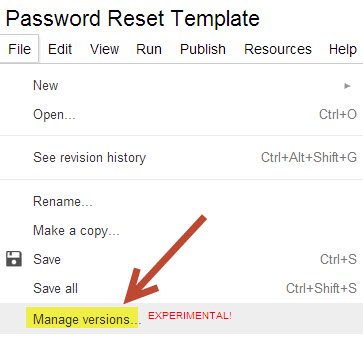
Once you have the Google Apps Script file open, the first step is to change the default password. Go to line 104 and change the red text inside the quotes to your default reset password. Next you will have to deploy it as a web app. To do that click File -> Manage Versions.


Then just click save new version. (You don't have to type anything in the box.) Now click Publish -> Deploy as web app.


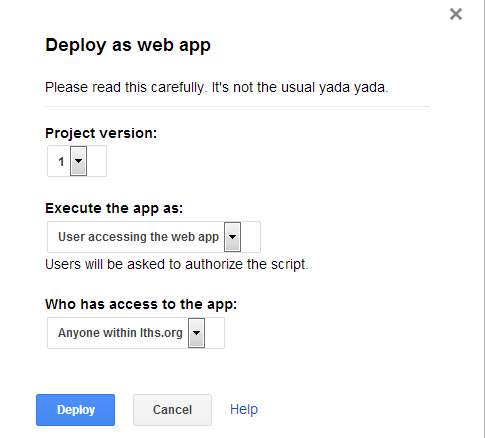
Choose the settings as shown below. (Of course the last one will show your domain, not lths.org)


Now the web app is deployed. Use the link that pops up to share it. The final step is to control which users have access to this script. You do this by granting access to the provisioning API in the Google Apps Control Panel. To do this you will need super admin rights to the control panel.

Start by going to the Domain Settings tab, then the Admin roles tab. Then click create new role. Give the new role a name. (If you prefer, you can use an existing user created role)


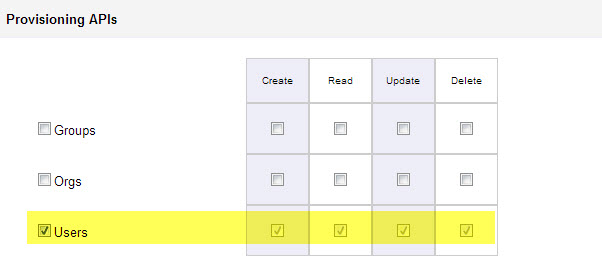
Within this role, scroll down to the bottom and look for the Provisioning API's section. Click users. (This should automatically check the 4 columns to the right.) Click save changes.


Finally, assign admins to this role. They will have to authorize the scrip the first time they use it.