Sunday, February 24, 2013

Update to Google Forms with Images

I have updated the Google Forms with Images Script. It should now work with the new forms. You no longer need to make a copy of my template - you can add images to existing forms.

The initial setup is the same. You should only have to complete steps 1 through 3 once. If have used a previous version of this script and already have a public GFWI folder, skip to step 4.


1. At the top level or root of your 'My Drive' (by top level I mean not inside any other folder) create a folder called 'GFWI'. (Don't type the quotes!)

2. You need to make this folder public. 


3. Inside of GFWI, create a folder called 'img'. (No period or quotes!) This is the folder where you will upload all of your images. An added benefit of this new system is that you can use the same images for multiple forms.

4. Create a form as you usually would. (Or modify an existing form.) Where you want an image to appear, just type the image name enclosed in double straight brackets. For example [[myimage.jpg]]. You should be able to include images anywhere in the form. (Including answer choices.)

5. After you have added the bracketed image tags, just copy live url for your form. This is the link you would use to distribute your form to end users. Paste that link into this formhttp://goo.gl/RXToK (The first time you use the script you will have to authorize it.)

6. That's it! A link to your form with images should appear. For your records, a spreadsheet called GFWI links will be created inside the GFWI folder.

Known issues: 
  • This does not work with multi-page forms
  • This does not work when the form is set to collect Google Account Usernames
  • I know the formatting could be better. If anyone who is talented with CSS would like to help me update the script and improve the styling, please let me know.
If you need help you can leave a comment here or contact me on Google+.

Thursday, February 14, 2013

Password Reset Tool for Google Apps

Last August we rolled out Google Apps at my school. It is getting used in some really creative ways, but because we are not yet one to one, users are not logging in often enough to remember their passwords. So we get a lot of help desk calls to reset passwords. I know it is not the most secure, but to keep it simple, we have a default password that we always use when we reset. To do this in the control panel, you have to browse for the user, then type in the new password twice. Doing this often gets old. So I wrote a simple script where all you have to do is type in the user name. (This is the email address without the domain.) Next a confirmation screen displays the user's first and last name. One final click and the password is reset to your predetermined default password.

Set up is fairly simple, you can just copy and paste the code from below into a Google Apps Script File, or click here to create your own copy by selecting File -> Make a Copy.

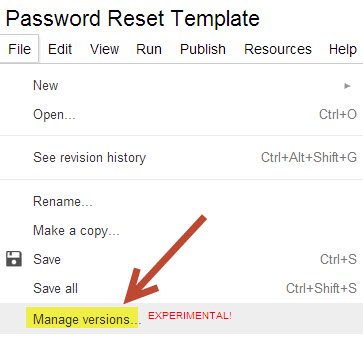
Once you have the Google Apps Script file open, the first step is to change the default password. Go to line 104 and change the red text inside the quotes to your default reset password. Next you will have to deploy it as a web app. To do that click File -> Manage Versions.


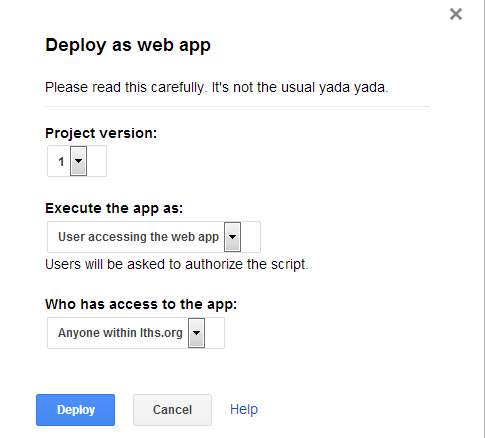
Then just click save new version. (You don't have to type anything in the box.) Now click Publish -> Deploy as web app.


Choose the settings as shown below. (Of course the last one will show your domain, not lths.org)


Now the web app is deployed. Use the link that pops up to share it. The final step is to control which users have access to this script. You do this by granting access to the provisioning API in the Google Apps Control Panel. To do this you will need super admin rights to the control panel.

Start by going to the Domain Settings tab, then the Admin roles tab. Then click create new role. Give the new role a name. (If you prefer, you can use an existing user created role)


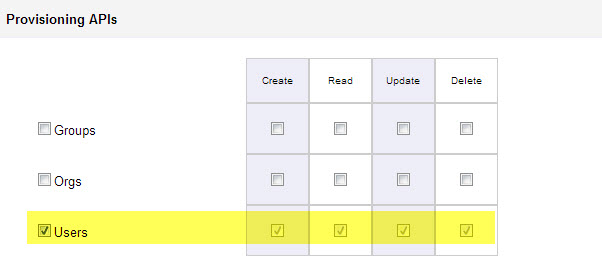
Within this role, scroll down to the bottom and look for the Provisioning API's section. Click users. (This should automatically check the 4 columns to the right.) Click save changes.


Finally, assign admins to this role. They will have to authorize the scrip the first time they use it.


Friday, December 7, 2012

Google Forms with Images

Update:

Because Google now allows hosted files with a directory structure from Google Drive, I have updated this script to utilize Google Drive. You no longer need Dropbox or any other hosting solution.  Also, you no longer need to name your images with numbers. The script will find any image file with any name. You just need to make sure you type the name correctly, enclose it in double square brackets and include the extension.

The setup is minimal.

1. At the top level or root of your 'My Drive' (by top level I mean not inside any other folder) create a folder called 'GFWI'. (Don't type the quotes!)

2. You need to make this folder public. 


3. Inside of GFWI, create a folder called 'img'. (No period or quotes!) This is the folder where you will upload all of your images. An added benefit of this new system is that you can use the same images for multiple forms.

4. Open up the view only copy of this spreadsheet. (goo.gl/F5gL4)

5. Click "Yes, make a copy".

6. On your own copy click Form -> Edit form.  

7. Create a form as you usually would. Where you want an image to appear, just type the image name enclosed in double straight brackets. For example [[myimage.jpg]]. You should be able to include images anywhere in the form. 

8. After saving and closing the form editing window, go back to the spreadsheet and click 'GFWI', then select 'Create Form with Images'. You will have to authorize the script the first time you run it from a spreadsheet.

9. That's it! A link to your form should pop up.

Here is a video that Brian Weinert created demonstrating the process. Thanks Brian!


If you have any troubles, please let me know here or on Google+.

Monday, May 7, 2012

Interactive YouTube Video

Last week I watched James Sanders' YouTube in the Classroom session during the Google Education On Air technology conference. It was very informative and it had some great resources.  The idea that got me most excited was the interactive feature in YouTube videos.  Viewers can click linked annotations in YouTube videos that link to other videos.  There are endless possibilities with what you can do with this.  I would like to try doing quizzes and maybe choose your own adventure type story telling next year.  But being so close to the end of the year, and with end of grade testing coming up, I went with a simple video to try out this technique.

I recorded 10 teachers in our school offering a test taking tip to students.  I uploaded those as 10 separate YouTube videos.  Then I made a video of myself offering a brief introduction.  Then the viewer clicks a teacher's name to view their tip.  At the end of each tip, there is a link to go back to the table of contents video.  I used iMovie to add that 'title' slide at the end of the tip videos.

It is a pretty simple implementation of this technique, and I wondered if it offered any benefit from just putting the teacher tips in sequential order in one YouTube video.  I guess it is debatable, but I think one benefit is that students are more likely to pay attention to the tips this way.  Because they are making a choice, and the tips are delivered one at a time.

Another great example and some instructions on the (simple) annotation process can be found on the Knewton blog.   I love their idea of the hint box.  Very cool idea.  I could see having a question of the day for students to work on at the end of class, then they can submit an answer via a google docs form. Now we just need one to one in the school where I work.

See the video below.

Thursday, April 26, 2012

Great Typing Web App


At our last technology meeting there was a discussion about our students' lack of typing skills. This becomes a serious issue when the reach the high school level, in particular in our system because we have a 1 to 1 initiative there, so students who cannot type are going to have some problems keeping up.

 We have Type to Learn 3 installed on our network.  It does a sufficient job, but I am not crazy about it.  For one, we have one set of Chromebooks and are hoping to get more, so I needed a web application.  But also, the software seems a little childish - which middle school students do not respond well to.

I did a lot of searching around and I struggled to find a quality alternative.  Eventually I found Typing Club and I have been very pleased with it.

Here are some of the reasons I like it:


  • It is currently free (they plan to charge in the future, though their pricing seems like it will be affordable)
  • It has a teacher portal - it is very easy to add students.  (It took me about 5 minutes to set up classes with our middle schoolers, you just copy and paste from a spreadsheet) 
  • If you set up a school account, you get a subdomain portal that students use to login.  (For example yourschool.typingclub.com)
  • It can show them which finger they should use for each keystroke
  • It has 100 lessons which go through a typical keyboarding pattern.  (Starting with home keys progressing to numbers and symbols)
  • You can modify the wpm or accuracy % required to pass a lesson.
  • You can add custom lessons
  • It is simple, no frills, no games, no distractions - just typing, which I think is good for middle school. (I haven't tried it yet with younger students)
  • Surprisingly, one of the best features was the scoreboard, which lets students follow each other's progress.  Middle School students (boys in particular) seemed to be obsessed with getting as high as they could on that scoreboard.  To the point that several went home and typed on their own with no direction from me, just to try to win.   Other comments I heard - "this is addictive" and "can we doing that typing program again today?"


Wednesday, March 7, 2012

Getting Students Started with Google Apps

We finally have Google Accounts set up for students.  I am really looking forward to having students use this tool.  8th Graders signed in on the Chromebooks last week.  Everything went well, the hardest part of the whole process was probably the captcha.  Most students did this just fine, but it was a challenge for some.  (I know I can have a hard time with them sometimes.  "Is that a k or an r?...")  

Students loved taking their pictures on the Chromebooks.  Of course, it turns out that picture does not attach to their Google Account, it is just local to that particular Chromebook.  So the teacher asked if their was a way to get the picture onto their Google Account.  I knew this was simple enough on desktop, but I had to think about it a little bit on a Chromebook.  My first thought that maybe it would be an option to add a picture straight from the webcam in gmail.  No luck.  I had to find a web app that could save the picture from the Chromebook web cam to the Chromebook hard disk.  Just as I was going to do a web search, as student had a solution.  Web Cam Toy.  Awesome - it worked, it was fun and easy, and they even have an app in the Chrome Web Store, so I can automatically install it on the Chromebooks.  This is why it is so fun to work with students.  

Monday, February 6, 2012

The Cart has Arrived


If you order 30 or more Google Chromebooks, you receive a free cart.  Our Bretford cart arrived today.  It was impressed, especially for a free cart.  It has a 'smart' charging system that  which seems to do a good job at keeping Chromebooks from getting to hot. It also has excellent cable management.  There are locking doors on each side.  The back is used for organizing the ac adapters.  I like that this compartment can be locked independently of the Chromebooks, I think it will be easier to keep the cart organized if fewer people have access to that side.  

An 8th grade class used them to take a test via a Google Docs form.  I gave a brief explanation of how to use the touchpad, but I am not even sure that was necessary. They didn't seem to have any trouble.  They seemed to like them too.  I had one of the students come and ask me if she could use one today.  I told her she could just use one of the desktops in the lab and she responded..."but they take forever to log on!".

Users this week include a 4th grade class taking an online test, and a 3rd grade class visiting spellingcity.com.  I am going to try to expose grades 3-8 over the next few weeks, just so everyone has used them one.  I suspect students and teachers will start requesting them soon after that.